Prev Next
Edit this page to change styles
--- Boxes and outlines ---
--- Headers beyond ordinary "!" level headers
--- Stegi specific stylings ---
--- Text warnings, notices, hilights ---
--- Directory paths ---
--- Calendar specific ---
Developer Overview
|
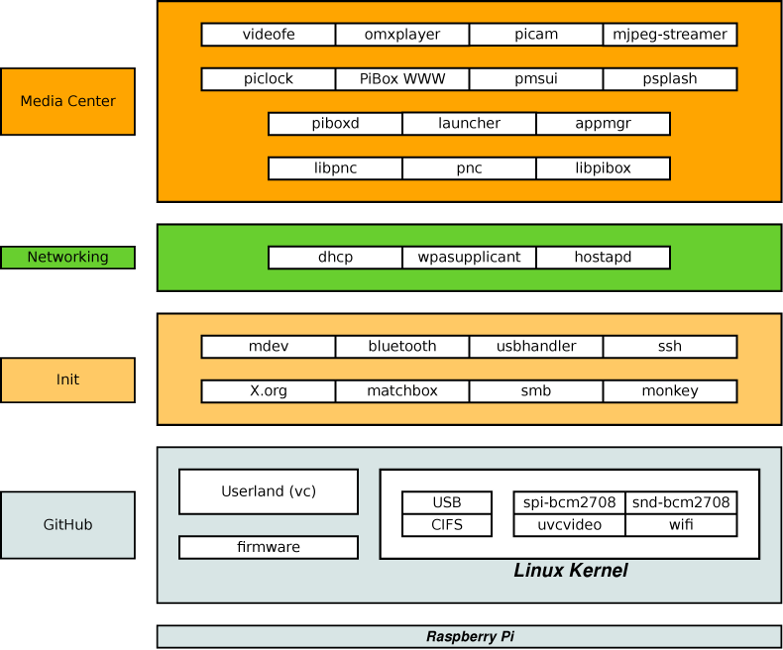
| Figure 1: PiBox Software Stack
|
The PiBox Development Platform and PiBox Media System consist of a variety of software components. At the bottom layer of this diagram are components retrieved from the official source code repositories for the Raspberry Pi. This includes a version of the Linux kernel, binary firmware used for bootloading and high end graphics support, and userspace libraries supporting hardware accelerated graphics.
Above this are a collection of boot processes, configurations and 3rd party applications supporting both the development platform and the media systems. Most of the applications are part of the base root file system build while some, such as psplash and monkey, are 3rd party applications installed with opkg formatted add-on packages. The usbhandler is a PiBox-specific utility for dealing with loading drivers for USB devices via mdev.
The networking layer of this stack shows how PiBox connects to the outside world. The default networking configuration assumes a wireless connection via wpa_supplicant and DHCP though wired connections are also supported. PiBox devices can also be configured as a wireless access point through the use of hostapd. Network configuration from a user perspective is handled through one of the two available UIs: the X.org based console UI or the web based UI. Both UIs provide a network configuration utility.
At the top layer of this stack are the PiBox specific components. The piboxd daemon handles overall system management, primarily as a proxy for the web UI. The appmgr daemon is started by X.org at boot time and starts a full screen launcher application. This is what gives PiBox media systems their consumer device oriented UI. The launcher provides access to a series of configured apps such as the Video Player. When a user selects an app the launcher notifies the appmgr which starts that application. The stacking window manager from Matchbox forces the new app to the top of the stack, though in reality the appmgr guarantees that only one app plus the launcher are ever running.
The PiBoxWWW package contains a web service run under the Monkey web server. The web service includes user authentication and provides both user applications and a RESTful interface to Android apps.
Distribution vs Build System
There are public binary releases of PiBox Media Systems, which includes the PiBox Development Platform. However, developers will want to use PiBox as a build system. As a developer you should think of the PiBox Development Platform more as an alternative to OpenEmbedded or Yocto than as an alternative to Raspbian.
As a build system, PiBox wraps existing component build tools to make it easier to create platform builds for specific hardware. Initially only the Raspberry Pi was supported. But PiBox has been ported for other hardware projects at the companies where I've worked. The beauty of PiBox is it's structured way of separating out the major components of a distribution: toolchain, bootloader, kernel and root file system. Custom applications, in a cross-toolchain environment, are simply built by referencing these components. This can be seen by examining the build systems for the various repositories associated with PiBox for the Media Systems.
PiBox is not a lot of code. It's just a build system, and in that it's just a build system that wraps other build systems. The idea is to make it possible to quickly build for a different hardware platform given that all platforms have the same major component requirements: toolchain, bootloader(s), kernel and root file system. It doesn't actually matter which bootloaders are used or which target hardware will be used. What matters is that all embedded systems have these requirements. Even if the bootloader is internalized to the hardware that boots it straight to Linux or some other bare metal software, there is still a bootloader somewhere. PiBox is structured to allow building required components in a proper order to generate a distribution for that target hardware.
There are some things that PiBox does now that are not completely portable, however. Building a portable installation package for the cross-toolchain, for example, is not possible due to the variety of build platforms it may be used on. So it defaults to CentOS because that has long term support and is compatible (for the most part) with the Fedora systems used by the primary developer for PiBox. But package building of build artifacts (re: the output from building the major components) is also easily modified because of the common structure utilized by PiBox for performing build actions.
Building the PiBox Development Platform is actually rather easy. Extending it is only slightly harder. The basic steps to developement are as follows.
- Get the Development Platform
- Install cross compiler package
- Unpack staging tree
- Set environment variables
- Copy cross build script
- Start building apps
Get development platform
The easiest way to start development with the PiBox Development Platform is to use the binary release. The release archive includes a cross toolchain RPM suitable for use on Fedora (it may work on other RPM systems as well) and a staging directory against which applications can be linked. The primary issue with using this method is the need to use it on Fedora. If you use another platform you will want to build your own release.
While it's possible to use PiBox public binary releases to build an application framework it's more likely that developers will customize the root file system using the PiBox Development Platform directly. The platform is a metabuild wrapping a collection of tools used to create a cross toolchain (compiler and friends), the Linux kernel, a root file system using BusyBox and Buildroot and the Raspberry Pi firmware from its GitHub repositories.
Basic details on building the development platform is covered in the Software Developers Guide. This includes information on building the cross toolchain, bootloader firmware, Linux kernel, VidCore/OpenGL libraries, and a root file system. Additional information is provided on how to push build artifacts to an SD card for testing.
PiBox files
The PiBox source tree has a few files in the top level directory and a series of directories below that. Since PiBox is specifially designed to build for the Raspberry Pi using Linux it has subdirectories specific to those needs. But these can be easily changed to fit other platform builds.
The top level directory includes three files:
- Makefile and utils.mk
- config.mk
It also has a series of directories.
- configs
- docs
- pkg
- scripts
- src
The Makefile is the entry point to the build and does very little. It includes the utils.mk file to provide some convenience targets and configuration such as colored output and simplified file retrieval from the Internet. It also includes the config.mk. This file is the starting point for configuring a build for a specific platform.
The config.mk file should include global configuration parameters such as
default mirrors, architecture specifications and the location of required
utilities such as opkg. It also includes the files found under the config
directory and then provides a top level showconfig target. The showconfig
target is generally called via component-showconfig targets to provide complete
configuration information for a component build. For example, the toolchain
target prefix is xcc. To show the configuraiton target for the toolchain use
xcc-showconfig which also calls the top level showconfig. The output for the
default configuration looks like this
Example output for a component showconfig target
$ make xcc-showconfig
### 2015-03-01 10:38:28 AM Common Configuration
Components : xcc rpifw kernel gles busybox buildroot pkg opkg
Packaged Components : xcc rpifw kernel gles buildroot
Version : 0.9.0
ARCH : arm
HW : rpi
JOBS : 4
SRCDIR : /home/mjhammel/src/ximba/raspberrypi/src/src
ARCDIR : /home/mjhammel/src/ximba/raspberrypi/src/../archive
BLDDIR : /home/mjhammel/src/ximba/raspberrypi/src/../bld
CROSS_COMPILER : arm-unknown-linux-gnueabi-
XCC_PREFIXDIR : /home/mjhammel/src/ximba/raspberrypi/src/../bld/crosstool-ng-1.19.0.bld/install
XCC_PREFIX : arm-unknown-linux-gnueabi
KSRC : git
Kernel config (KSRC) : kernel-git
### 2015-03-01 10:38:28 AM XCC Configurable options
XC : xcc.rpi.1.19.0
XI :
### 2015-03-01 10:38:28 AM XCC static settings
XCC_VERSION : crosstool-ng-1.19.0
XCC_PKG_NAME : crosstool-ng-1.19.0.tar.bz2
XCC_URL : http://ymorin.is-a-geek.org/download/crosstool-ng/
XCC_JZ : j
DIR_XCC : /home/mjhammel/src/ximba/raspberrypi/src/src/xcc
DIR_PATCH : /home/mjhammel/src/ximba/raspberrypi/src/src/xcc/patches/rpi.1.19.0
XCC_SRCDIR : /home/mjhammel/src/ximba/raspberrypi/src/../bld/crosstool-ng-1.19.0
XCC_CTNGDIR : /home/mjhammel/src/ximba/raspberrypi/src/../bld/crosstool-ng-1.19.0.ctng
XCC_BLDDIR : /home/mjhammel/src/ximba/raspberrypi/src/../bld/crosstool-ng-1.19.0.bld
XCC_PREFIXDIR : /home/mjhammel/src/ximba/raspberrypi/src/../bld/crosstool-ng-1.19.0.bld/install
XCC_WORKDIR : /home/mjhammel/src/ximba/raspberrypi/src/../bld/crosstool-ng-1.19.0.bld/work
XCC_ARCDIR : /home/mjhammel/src/ximba/raspberrypi/src/../archive/xcc/crosstool-ng-1.19.0
XCC_BINDIR : /home/mjhammel/src/ximba/raspberrypi/src/../bld/crosstool-ng-1.19.0.bld/install/bin
XCC_CONFIG : /home/mjhammel/src/ximba/raspberrypi/src/src/xcc/xcc.rpi.1.19.0
XCC_PATH :
/home/mjhammel/src/ximba/raspberrypi/src/../bld/crosstool-ng-1.19.0.bld/install/bin:/usr/lib64/qt-3.3/bin:/usr/lib64/ccache:/usr/local/bin:/usr/bin:/bin:/usr/local/sbin:/usr/sbin:/home/mjhammel/bin:/usr/local/bin:/sbin:/usr/sbin:/home/mjhammel/bin:/home/mjhammel/bin:/usr/local/bin:/sbin:/usr/sbin
XCC_PREFIX : arm-unknown-linux-gnueabi
PKGPRJ : rpi
This output has colored headers where the ### are shown if you run it from a color-capable terminal.
The config directory contains a collection of .cfg and .mk files that are included in the top level config.mk file. There are one or more .cfg and .mk file for each build component. Usually a <component>.cfg has all the configuration required to build that component. Sometimes the <component>.cfg may include <component>-<value>.cfg files that provide repository or version specific configuration for that component. For example, there are currently three .cfg files for the kernel. The kernel.cfg includes a kernel-git.cfg or kernel-org.cfg depending on whether the build will utilize the Raspberry Pi kernel tree from GitHub or a different kernel pulled from the Kernel.org web site.
The same structure is true for the .mk files. Each .mk contains a set of targets for the named component, such as kernel.mk for kernel targets. If repository or version specific targets are needed, the <component>.mk can include <component>-<value>.mk files with those targets. However, the <component>.mk will need to be updated to call those targets as they would be extensions to the current build process.
So the config.mk and configs directory establish the rules for building components. Typically component software is retrieved by these rules from the Internet. Sometimes patches must be applied to the code that is retrieved, or maybe there is a local copy of the code that needs to be used instead. In these cases the component files can be stored under the src directory.
The PiBox tree has subdirectories under src for each build component. For the buildroot tree there are additional packages that are added to Buildroot prior to compiling that component. There is a skeleton tree that contains default configuration files for the running root file system that need to be copied into the output directory from the build of this component. There are extensions to Buildroot such as a postbuild.sh script that the Buildroot configuration references. All of these files are related to building this component but are not part of the source downloaded from the Internet. So they live in the buildroot subdirectory of the src tree in PiBox. There are similar directories and files under each of the other components specific to their needs.
The pkg tree contains tools and configuration used by the pkg.cfg and pkg.mk files found under the configs tree. These are used to create release packages. PiBox current delivers an RPM for the toolchain but otherwise doesn't package the distribution as part of the build. The build artifacts (re: the output from component builds) are stored under an out-of-tree directory (also called pkg) along with scripts used to create an SD card. This is so that developers don't have to package anything. They just install the components directly to the SD card for testing. The installation scripts for the SD card are stored under the scripts directory.
The docs directory holds a sample cdtools script. It should be copied to ~/bin/env and edited. See the comments in the file for help in editing.
The build process
Each component build has the same basic process.
- get the source archive to build
- unpack the archive in the out-of-tree build directory
- apply any required patches
- copy in the saved configuration for the component build
- run the component build
Each of these steps is handled by one or more targets in the <component>.mk file in the configs directory. Additionally there are targets to clean the component build tree of build artifacts (the -clean target) and to remove the unpacked component source tree and all of its build artifacts (the -clobber target).
The build process can be reduced to a single target, as in make buildroot. Or you can run each target manually. The process of retrieving the archive, unpacking it and applying patches is often done as a single step using the -init target. This allows you to prepare the component source tree for building before applying an updated configuration. To apply the configuration the -config (and sometimes the -preconfig before it) can be used.
Component builds can support more than one version of the component or more than one remote repository for retrieving the code. This is done with the .cfg files under the configs directory discussed previously. However, once there is more than one possible way to build the component there needs to be a way to specificy which repository or version to build. This is done with environment variables.
The list of current targets and supported environment variables for all components can be viewed using the -help target, as in this example.
Partial output from -help target
...
==========================================================
Cross Toolchain
==========================================================
The cross toolchain is built using the Crosstool-NG build
environment.
The cross toolchain is required in order to build all components
that will run on a specific board. The cross toolchain is
built with board specific features.
Environment variables for this component:
XSRC is not used
XR is not used.
XV can be set to the version of Crosstool-NG to use.
XI can be set to the install directory to be used by the RPM package
Set this if you'll be using a cross toolchain installed from the RPM.
Cross Toolchain Targets
-------------------------------------------
xcc-get Retrieve the Crosstools-NG package (called by xcc-init)
xcc-unpack Unpack the Crosstools-NG package (called by xcc-init)
xcc-patch Patch the Crosstools-NG package as needed
xcc-init Retrieve, unpack and patch the Crosstools-NG package
xcc-preconfig Copy in the local Crosstools-NG configuration template
and updates with local directory configurations
xcc Builds the cross compiler
xcc-menuconfig Edit the Crosstools-NG configuration using its menuconfig
xcc-saveconfig Saves the Crosstools-NG .config file from the build tree
into the source tree template with approprate tags.
xcc-clean Cleans out the cross compiler without touching
the Crosstools-NG package build.
xcc-clobber Removes the complete cross compiler build including
the Crosstools-NG package build, source trees, and archives.
xcc-showconfig Shows the configuration that will be used to build
the cross compiler
xcc-pkg Builds an RPM that can be installed on the local system.
xcc-opkg Builds an opkg of debug utilities to run on the target.
...
Editing components
An important aspect not covered by the PiBox Development Platform Software Development Guide is how to modify component configurations. Each major build component (toolchain, kernel and busybox/buildroot) includes a -menuconfig target for editing the components configuration. The toolchain will probably not need editing unless you build for a future version of the Raspberry Pi or choose to port to different hardware, however the kernel and BusyBox/Buildroot may. After making changes the associated -saveconfig target should be used to copy the updated configuration into the local source tree so it can be used on subsequent builds.
An example session for modifying the root file system would use the following commands.
Editing, saving and using a modified Buildroot configuration
make buildroot-menuconfig
make buildroot-saveconfig
make buildroot-clobber
make buildroot
The first command takes you to the menu-based configuration utility for Buildroot. Save the configuration file when prompted at exit from this utility. The second command copies the configuration file to your local source tree from the Buildroot source tree. The third command removes any previous build and the fourth command will build the root file system from scratch.
It is possible to rebuild the root file system after making changes without deleting the previous build. In this case substitute the following command for the last command in the previous example.
If you modify or patch a build package and need to rebuild it, change into the buildroot/output/build tree and remove the old package build, then return to the PiBox source tree and run the -rebuild command. This following is an example of this process using cdtools.
Rebuilding the root file system for minor changes
<make changes to Buildroot's xterm package>
cdb
cd buildroot-<version>/output/build
rm -rf xterm-278
cdx
make buildroot-rebuild
Making changes to Buildroot packages is beyond the scope of this document. However, it's easy to do and there are some examples of modified packages in the PiBox source tree.
Rebuilding the root file system is needed if you make changes to the skeleton directory under src/buildroot/skeleton. This directory holds default configurations that are added to the root file system outside the scope of Buildroot. It is also required if you modify and rebuild one of the other PiBox components (kernel, Raspberry Pi firmware or VidCore).
A root file system build can take a very long time, depending on the speed of your CPU the number of cores it has and the amount of system memory. On a quad core system with 16GB of memory this can take 2 or more hours. Rebuilds are a way of speeding that process up if only minor changes are being made to other components or the skeleton tree.
Patching components
Major PiBox components have patches directories under their component source tree. For example the kernel has src/kernel/patches/<version> where <version> depends on which version of the kernel you are building. Component patch tree paths are as follows.
- toolchain: src/xcc/patches
- kernel: src/kernel/patches/<version>
- buildroot: src/buildroot/patches/<version>
BusyBox and VidCore builds do not currently support a patches directory.
If patches are found by the component build process they are applied after the code is unpacked into the build tree but before the component configuration is applied. Patches are applied alphanumerically so they should be ordered using a numbered prefix. Patches should be created using the unified format (with diff -u, for example).
Specifying versions
If multiple repositories or versions are to be supported by the .cfg files for a component then they should use appropriate environment variables. Each .cfg file assigns values to environment variables using one of two formats.
- MYVAR1 = value
- MYVAR2 := value
Variables assigned with the first format can be overridden on the command line. For example, MYVAR1 can be overridden with the following command.
make MYVAR1=newvalue buildroot
However, variables with the second format cannot be changed on the command line. The use of the first format is limited to variables that can affect which repository or version is to be built. These variables are described in the component sections of the output from make help. For example, the variable KV can be used to specify a different kernel version.
Of course, this only works if there is a configuration file for this kernel in the src/kernel/ directory.
Not all components currently support specifying alternative repositories or versions. The following components support these
variables.
- Toolchain
- Kernel
- Busybox
- Buildroot
The VidCore and firmware components simply take the latest versions from their respective repositories.
Component Builds
Now its time to look at modifying specific components of the build. The order of the component builds should always be as follows.
- Cross toolchain
- Bootloader
- Kernel
- Root file system
There may be additional steps, as with PiBox there are steps for acquiring the VidCore (re: OpenGL) component before building the root file system.
Cross toolchain
The cross toolchain doesn't need to be edited for the Raspberry Pi. If you need to port it for another platform you need to dig into how you configure Crosstool-NG for that platform, specifically for the procesor on that platform. The scope of editing the toolchain configuration for a new board is beyond the scope of this document. For more informations, start with the Crosstool-NG web site and start digging into how to use the gcc compiler with the target processor.
Bootloader
For PiBox the bootloader is a binary blob for the Broadcom processor along with configuration files associated with that blob. It turns out that this blob is also the code for using the GPU on this processor. In other words the GPU is used to run the bootloader. This step could be changed to also grab Das U-Boot to create a second stage bootloader to do additional work. However, PiBox doesn't do this.
Since this step just downloads prebuilt software there is no additional configuration step. It is possible to manually edit the configuration files for the bootloader. Modified copies of the bootloader configuration files are stored under the scripts directory. For more information on how to edit these files see the RPIConfig page at eLinux.org.
BusyBox builds
BusyBox is used by Buildroot to create an initial directory tree of useful utilities that are lightweight compared to their traditional counterparts on a desktop Linux distribution. Once that directory tree is built, Buildroot adds to it with any configured applications that are built essentially the same as if they were built for you desktop.
BusyBox in PiBox is used to crete an initial ramdisk that can mount the overlay and squashfs configuration that holds the root file system generated by Buildroot. The BusyBox configuration in PiBox is specifically used for the initramfs, not for Buildroot.
Editing and saving a modified BusyBox configuration
make busybox-menuconfig
make busybox-saveconfig
make busybox-clobber
make busybox
Buildroot
Editing and saving a modified BusyBox configuration
make buildroot-menuconfig
make buildroot-saveconfig
make buildroot-clobber
make buildroot
Kernel builds
Modifications to the kernel configuration are handled using similar targets to editing the Buildroot configuration.
Editing, saving and using a modified kernel configuration
make kernel-menuconfig
make kernel-saveconfig
make kernel-clobber
make kernel
The kernel target is used to build both the kernel and all loadable modules, as well as download any configured firmware blobs. Modifications to the kernel configuration typically require a complete rebuild of the kernel target.
Combining components
The order of the build is important. You need the cross toolchain to build everything else. Then you need to build the Raspberry Pi firmware, then the kernel, then the VidCore components and finally the root file system. This is because the root file system will grab the build artifacts from ther kernel, firmware and VidCore builds from their build trees and copy them into the newly created root file system directory tree. This directory tree is called the target tree.
If the root file system is to be rebuilt using the -rebuild target then the old components are first removed from the target tree, the root file system rebuild is run, which picks up any changes to the other components. This means you can rebuild any of the components and then quickly rebuild the root file system.
Out of tree builds
PiBox relies on the use of cdtools for navigating the source, build and package trees. PiBox does all builds outside of it's source tree so that changes to the source are more easily seen using git status. The cdb alias will take you to the build tree while cdx will return you to the source tree.
Packaged components are also stored outside of the source tree. The cdp alias takes you to the package tree.
Other aliases are configured by default and there is no reason why you can't create additional aliases for your own needs.
Install cross toolchain
The cross toolchain doesn't have to be installed if you've built it manually. The PiBox build system will use it from its build tree if it's there. Alternatively you can install the toolchain and use the XI environment variable to point to the installed toolchain. The PiBox release includes an RPM package for Fedora for the toolchain. If this RPM is used then the XI environment variable can be used, though the default value for XI is the RPM installation directory (/opt/rpiTC).
Unpack staging tree
Cross compiling apps for the PiBox platform requires two components: the cross toolchain and the staging tree. The staging tree is packaged with the PiBox release package. But this is nothing more than the staging tree from the Buildroot component build. All existing apps use a shell script to point the app build to the staging tree using the STAGING environment variable. This variable can be set from your PiBox build tree as in this example.
Pointing at the staging tree
cdb
cd buildroot-<version>/output/staging
export STAGING=`pwd`
Copy cross build script
Compiling apps for your platfrom requires use of the cross toolchain and the root file system staging tree. The staging tree contains libraries and utilities needed to cross compile your app.
The following script is an example of how you can setup cross compiling of your application. This script is used in building the launcher app, which has a build system based on GNU Autoconf.
Cross build script
#!/bin/bash -p
# Allow setting toolchain, staging and opkg directory from command line.
while getopts ":o:s:t:" Option
do
case $Option in
t) TC=$OPTARG;;
s) STAGING=$OPTARG;;
o) OPKG_DIR=$OPTARG;;
*) echo "./cross.sh [ -o dir | -s dir | -t dir ]"; exit 0;;
esac
done
# Note: STAGING_DIR is the <buildroot>/output/staging generated from the "make buildroot" for PiBox.
if [ "$STAGING" != "" ]
then
export STAGING_DIR=$STAGING
else
if [ "$BR" != "" ]
then
export STAGING_DIR=$BR/output/staging
else
echo "You must set BR to the top of your buildroot tree or STAGING to where the staging tree l
ives."
exit 1
fi
fi
# Toolchain should be the toolchain built with PiBox and installed as an RPM.
if [ "$TC" != "" ]
then
export TOOLCHAIN=$TC
else
echo "You must set TC to where the cross toolchain lives."
exit 1
fi
# Need to specify where the opkg tools are installed.
if [ "$OPKG_DIR" = "" ]
then
echo "You must set OPKG_DIR to where the opkg-build program lives."
exit 1
fi
# Need to specify where the opkg tools are installed.
if [ "$OPKG_DIR" = "" ]
then
echo "You must set OPKG_DIR to where the opkg-build program lives."
exit 1
fi
if [ -f config.log ]
then
make distclean
fi
echo "Toolchain : $TOOLCHAIN"
echo "Staging tree: $STAGING_DIR"
autoreconf -i
PATH=$TOOLCHAIN/bin:$PATH \
CFLAGS="-g -I$STAGING_DIR/usr/include" \
LDFLAGS="-L$STAGING_DIR/usr/lib -L$STAGING_DIR/lib --sysroot=$STAGING_DIR/" \
./configure --host=arm-unknown-linux-gnueabi
PATH=$TOOLCHAIN/bin:$PATH \
CFLAGS="-g -I$STAGING_DIR/usr/include " \
LDFLAGS="-L$STAGING_DIR/usr/lib -L$STAGING_DIR/lib --sysroot=$STAGING_DIR/" \
make
OPKG_DIR=$OPKG_DIR DESTDIR=`pwd`/install make install pkg
echo
echo "----------------------------------------------"
echo "opkg has been built under the opkg directory:"
echo "----------------------------------------------"
echo
ls -l opkg/*.opk
Start building code
Now that you've built the development platform you're ready to start writing an app. There are a few things you should know about the media systems apps. First, the launcher app
can be changed. All that's required is that it reads %path$/etc/launcher files to know which other apps are available.
Second, there is a messaging format between the various user space apps and daemons. This information is available in the Message Flow page of the wiki. Sending messages to the various components will require an understanding of the message format, which is very simplistic, and what each app or daemon does with these messages.
Because PiBox is not a fully abstracted frame work like Android, apps can have direct access to hardware. User interaction is through an attached keyboard or the piboid app for Android, which sends keystrokes through the web UI's RESTful interface which passes it to the appmgr on its way the currently running app.
Apps are written in GTK2 to make them simple to develop. Inbound keystrokes must be handled using appropriate event handlers. See the launcher, clock and videofe apps for examples.